Raspberry Pi Tutorials Review: 10.1″ Raspberry Pi 4 Tablet – Review of the RasPad 3

The RasPad 3 is the successor to one of the first Raspberry Pi tablets and has everything you need for a modern tablet. It combines the advantages of a Raspberry Pi with the applications of a tablet. Above all, you can tinker with it on the go. Since it costs about the same as a comparable device, let’s take a look at the specifications and advantages and disadvantages of the RasPad.
Hardware Supplied
The RasPad 3 is supplied as a “kit”, but you don’t have to assemble a lot. In the official shop, it is offered for $219, but there are additional shipping costs and – depending on the country – import taxes. However, the RasPad is delivered without the Raspberry Pi 4*, which you should consider if you are planning to gift it.
The device is sent from the Far East (with me via UPS) and arrived within a few days. I received a notification in advance that I would pay the import tax and was able to do this online. Otherwise, the postman would have accepted the payment on site.
Here is a quick look at the specifications of the RasPad:
- 10.1″ HD touchscreen
- 270 x 127 x 47 mm (10.6 x 5 x 1.8″)
- 3000 mAh battery
- Built-in stereo speakers, microphone connection
- Supports many different operating systems
- All connections of the Raspberry Pi (GPIO, CSI, USB 3.0, Ethernet) can still be used
First Steps with the Raspberry Pi 4 Tablet
Before we start building the tablet, we should flash the operating system, as this takes some time. You can use the Raspberry Pi Imager to flash the operating system. We can use any Raspberry Pi compatible operating system but start with the RasPad OS. It is a few gigabytes in size, which is why our memory card must be at least 8 GB in size.
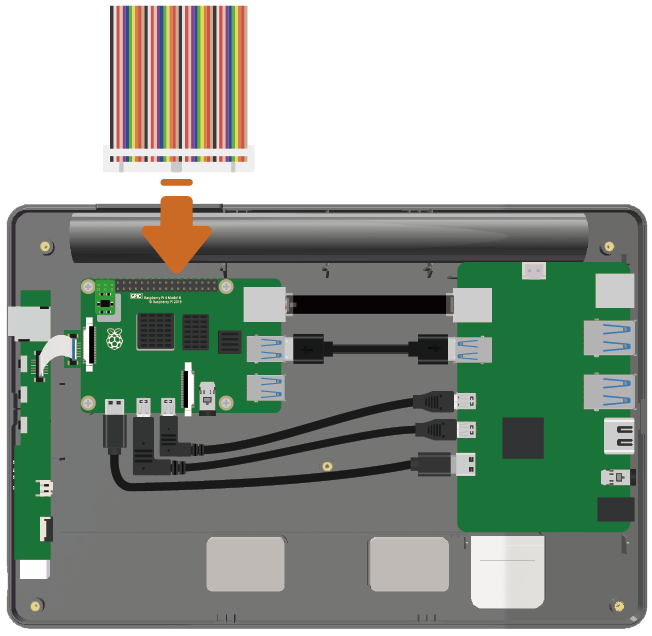
In the meantime, you can unscrew the housing and insert the Raspberry Pi 4. Then connect all cables to the board (step-by-step instructions are available here).
By the way: Here you can find the official SunFounder documentation for the RasPad 3.
Usability & Battery Life
A 3000 mAh battery is built into the housing of the RasPad 3. With normal use (watching HD videos, surfing the Internet) the electricity lasted for about 3 hours. For “simpler” office applications, the capacity should be sufficient for up to 5 hours. If you have a socket nearby, you can charge the RasPad at the same time with the included power supply (15V, 2A). If the battery is too weak, a warning appears on the Raspberry.
What I also noticed positively are the well-made buttons on the side of the device. This enables the tablet to be switched on and, above all, to be switched off again safely at the push of a button. This functionality is not readily available with the Raspberry Pi.
RasPad 3 Applications
Since we can already implement countless projects with the Raspberry Pi or connect a wide variety of sensors, we also have all these options here.
First of all, you can say that the RasPad – especially for children – is a very nice way to learn to program. You can also use Scratch for this, with which you can build a program using logic blocks. SunFounder has released a similar development environment called Ezblocks. This is specially adapted to the Raspberry Pi and even shows graphically which components have to be connected.
Multimedia Applications
The topic of gaming is of course also interesting for children. We can easily install RetroPie on the Raspberry Pi and play console games with it. Since the RasPad has four USB ports, we can connect multiple controllers and play in multiplayer mode.
Another application is the Android tablet. In addition to KODI, Windows 10, and much more there are also Android distributions that we can use with the Raspberry Pi. As soon as we have installed it on the SD card and configured it, our tablet runs with the Android operating system.
Those who have a 3D printer without a queue probably know the problem: To start a print quickly, you either have to walk to the printer and start it manually, or you need a print server like Octoprint. Now we can also use a display/touchscreen with Octoprint – or we can simply use the RasPad and place it next to the printer. So we have two in-one.
Furthermore, classic Office applications can also be run naturally. With LibreOffice, the most important tools are already available and mail clients are also available for Linux distributions. However, I do not see this as the primary advantage of the RasPad.
For a wider overview, check out this project ideas page.

Conclusion on the Raspberry Pi Tablet
With the RasPad 3, you get a solid tablet for hobbyists, which is a bit thicker than ordinary tablets because there is a Raspberry Pi 4 inside. The Pi is not included as standard and should already be there. The nice thing about it is that all functions of the Raspberry Pi can still be used – even when you are out and about.
If you are mainly looking for an all-in-one device with which you can run office applications, but at the same time can also do handicrafts, the RasPad 3 is in very good hands. The tablet is also a good investment for children who want to learn to program while playing. However, if you are looking for a pure tablet, you will probably not be too happy due to the lower battery life. Nevertheless, I find the overall package – design, workmanship, software – really neat and state-of-the-art.
Source:
https://tutorials-raspberrypi.com/10-1-raspberry-pi-4-tablet-review-of-the-raspad-3/