The Gadgeteer RasPad 3 review – Raspberry Pi in a tablet form factor

REVIEW – Once in a while a product comes along that revolutionizes an industry. The Raspberry Pi is arguably one of those products. If you’ve never used a Raspberry Pi, you’re missing out on some fun DIY computing projects. With a price that starts at just $35 for the bare board you can get a decent little computer set up for under $100. With so many options and kits available, though, it’s hard to know where to get started. One great solution is the RasPad 3 from SunFounder.
What is it?
RasPad 3 is a tablet-style case for a Raspberry Pi 4. With a built-in touchscreen, speakers, and a battery that lasts up to 5 hours, this portable device gives you a lot of flexibility for a variety of computing tasks. RasPad 3 gives you access to all the ports you would normally have on your Raspberry Pi except one USB port. On the Raspberry Pi 4 there are two USB 2.0 ports and two USB 3.0 ports. RasPad uses one of the USB-3 ports to connect to its internal USB hub but gives you three USB 3.0 ports on the outside so while you’re losing one connector, you’re gaining a USB 3.0 connector. I consider that an acceptable trade-off. Additional ports include a full-size HDMI output, gigabit ethernet, and a 3.5mm headphone jack.

Power is provided by an included wall-wart style power supply with a mini barrel DC connector. The Raspberry Pi 4’s own power connector is USB-C, but that connector is internal when used in the RasPad 3 so unfortunately you can’t easily use it with a regular USB-C power supply or external battery. It would be nice to have that flexibility, especially since so many other things are powered by USB-C now.
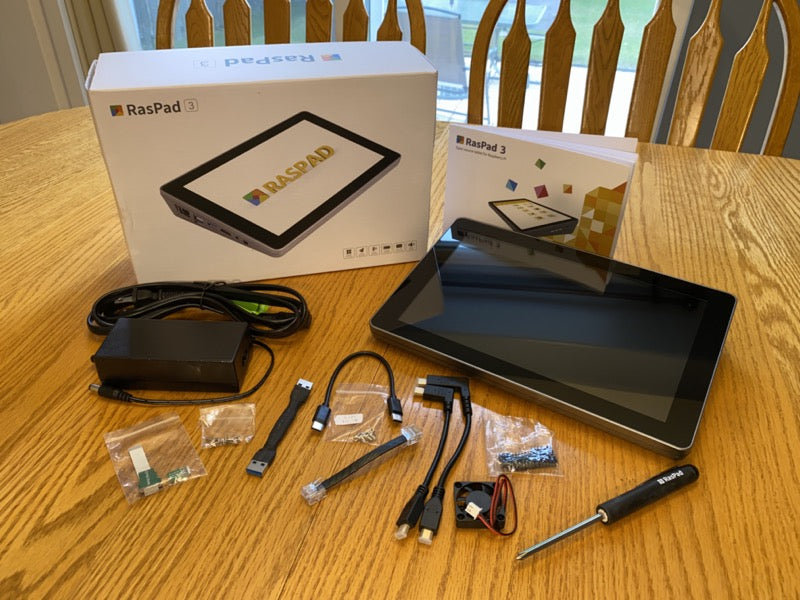
What’s in the box?
- RasPad x 1
- Micro SD Card Extension Board x 1
- Fan x 1
- FFC Cable x 1
- Accel SHIM Module x 1
- Heat Sink x 3
- M2.5×9 Screw x 1
- M2.5×4 Screw x 1
- USB Cable x 1
- Ethernet Cable x 1
- Type C Cable x 1
- Micro HDMI Cable x 2
- Power Adapter x 1
- Manual x 1
NOTE: The Raspberry Pi 4B Board is not included.

Hardware specs
Screen: 10.1” IPS Touchscreen
Multitouch: 10 Finger Touch
Resolution: 1280×800 Pixels
Power Supply: 15V/2A DC
Battery Life: 5 Hours
Stereo Speakers

Design and features
To be clear, this is not an iPad or Android tablet. It has a 10.1” touchscreen and a well-built plastic case, but it’s not a slim tablet like you may be thinking. It has a tapered design, approximately 2” at the back and .75” at the front. Even still it weighs about the same as your average tablet and is easy to carry around. It also doesn’t have the nice slim bezels of an iPad but it’s just fine for what it is.
In addition to the ports mentioned above, there are three buttons on the right side of the case. One is the power and screen on/off button. Pressing it for 3 seconds turns the power on and off (although as always, it’s recommended to do a proper shutdown before powering down to keep from corrupting data on the microSD card). A short press on the button, while the RasPad is running, turns the screen off; another short press turns it back on. This is a nice power-saving feature when you’re running on battery. The other two buttons are for screen brightness and volume control.

Next to the buttons is a series of four LEDs for power indication. One LED lights up red when the device is powered on. The other three LEDs indicate battery level; they blink while charging and stay solid when the battery is fully charged.
The microSD card slot is also on this side. It’s a snap-in style card slot with a spring-release mechanism. The card sits flush with the case, so it takes a small finger or a fingernail to release the card but at least you know it’s not going anywhere.
The opposite side of the case has all the connectors. The back of the case has a small slot to pass a ribbon cable through if you plan to use any of the Raspberry Pi’s GPIO pins. This would make it less convenient to carry it around as a tablet, but since the Raspberry Pi has so many configuration options and external capabilities with the GPIO pins it would have been a shame to not have access to them.
In addition to the included hardware and the Raspberry Pi itself, SunFounder makes several add-on kits available on their site. Options include a sensor kit, a Bluetooth keyboard with a built-in touchpad, and a 15.6” portable HD monitor. There is also a wide range of software applications and hardware accessories available in the DIY community, including the following:
- Movie & video viewer
- Music player
- Programming
- Games
- Game Emulators
- Productivity
- Browsing
- Home Automation
- Environmental sensors
- Cameras
- Robot & remote control vehicle kits
- Photo frames
- Lighting control
The great thing about these is that one little computer can do all of this in the same small package just by installing new apps or switching out the microSD card for a new OS and adding the accessories that are needed for each project.
This is a great little computer for not a lot of money. While this won’t be a screaming gaming machine or video editing powerhouse, for basic email, web browsing, and document creation, and lots of DIY projects, it’s hard to beat the size and capabilities of this device.

Installation and setup
It’s important to understand that this is very much a DIY project. While it’s a very flexible platform it’s not something that’s ready to be used right out of the box. While I know not everyone will go for this, I enjoy putting a project like this together, being a part of the process of making it all work and doing whatever I want with it.
Another important thing to know is that there is no Raspberry Pi included with the RasPad. On its own RasPad doesn’t do anything. I purchased a Raspberry Pi 4, 4 GB model for this review. It’s also available with 2 and 8 GB options. 4 GB seemed like a good middle ground for the things I’d like to do with this product.

Installation involves opening up the RasPad by turning it over and removing five screws that hold the top and bottom halves together. Once you’re inside you place the Raspberry Pi board on the mounting points and start tightening the screws. I left mine loose to make it easier to attach the cables. The cables go from the Raspberry Pi connectors to the RasPad extension board, allowing access to power, USB, ethernet, and display connections. There is a small ribbon cable with a TF extension board which slides into the Raspberry Pi’s microSD card slot to allow external access to the microSD card for installing a new OS or upgrading to a larger card down the road. Considering how often you may need to swap out microSD cards this is a must-have feature.

The last cable that needs to be attached goes from the expansion board to the case fan on the bottom half of the case. The fan needs to be installed, which is pretty easy, except that the screws I received weren’t long enough to install the fan in the direction the manual specifies. I had to mount the fan upside down, which probably means I’m drawing air into the case instead of expelling it. I didn’t notice a build-up of heat or any slow downs that could be attributed to overheating, but it is something to be aware of. If it ever becomes a problem I can easily find longer screws and reverse it. Maybe if I was gaming or playing a lot of videos and using a dual screen setup it might be more of a problem but so far it’s been totally fine for me.

After all the cables are installed and the Raspberry Pi board is screwed down the Accel SHIM needs to be installed. This is a tiny board which includes an accelerometer for sensing the orientation of the RasPad as you rotate it, just as you’d expect from an iPad or Android tablet. The screen blanks for a second or so while the screen rotates, which is a little jarring, but it doesn’t take long to get used to.
The last hardware step is to make sure the heat sinks are installed on the Raspberry Pi chips. These are included with the RasPad kit.
Once the hardware is put together it’s recommended to charge the battery fully before turning it on. I don’t think I waited for a full charge, but I did do all my initial testing with the RasPad plugged in so at least I knew I had enough power to get started with.

I used the default Raspberry Pi OS for most of my testing. I also tested with a music player called Volumio, which I’ll talk about more in a bit. The default OS is a good interface for those who are familiar with Windows, other flavors of Linux, or even macOS. It’s not quite as graphically refined as some more modern OSes but it’s very usable and configurable.
Once the RasPad 3 hardware is put together, the battery is charged, and the microSD card is inserted, press the power button for three seconds to boot it up. By default, the OS I used boots directly to the desktop with no password. It’s recommended to change this setting as soon as possible for security reasons.

Once the OS is up and running you need to install the virtual keyboard if you expect to use it in tablet mode. SunFounder has good instructions on how to install this through the terminal as well as some configuration options you might want to start with to make it a smoother typing experience. SunFounder also gives instructions for installing the screen rotation service for use with the accelerometer. Another utility to install is a right-click emulator to allow long-presses on the screen to act as a right-click on a mouse. I use right-click extensively, so this is a welcome feature.

The final software installation is the RasPad Launcher, an optional program that gives quick access to the built-in apps and configuration options. Although it’s not necessary it does give you touchscreen-friendly icons for launching many of the apps you’ll use on a regular basis. It’s at least a good way to get started until you know more about how the OS operates.
In Use
Wired networking worked as expected with the internal extension cable from the Raspberry Pi’s connection to the expansion board on the RasPad. I didn’t test wireless networking because it’s part of the Raspberry Pi and not the RasPad, although I did use it extensively during testing and it worked like it should have with occasional dropouts as with any wifi network (probably caused by the networks I was connecting to and not the fault of the RasPad).

I lost touchscreen control twice, I think. This required completely rebooting the RasPad. If this had happened more often, I’d be concerned but it never caused me any major headaches.
There are several games included with the default apps that are included with the Raspberry Pi OS. These were not very usable with only the touchscreen. Some require pressing one or multiple keys on the keyboard to interact with the game, which is not easy to do with an on-screen keyboard. I’m sure they’d be fine with an external keyboard and mouse but that takes away from the experience of using it as a touchscreen device. Since they’re just included with the default OS, I don’t count this as a negative against RasPad, but I wanted to point it out for those who may be interested in gaming on this device.
Overall, the RasPad 3’sscreen is high quality, clear, and easy to read in most lighting conditions. I would like it to get a little brighter but in general, it’s easy to use and a good size.

I typed this review on the RasPad with an external keyboard and mouse. I stood the tablet up on its back side and it worked as a small monitor. I did need to prop it up a little in the front for a more comfortable viewing angle, but this was actually a pretty fun way to write a review. Learning a new OS and device as I write about it is a different experience. I wouldn’t have wanted to write this much text with an on-screen keyboard, but that’s the same with any other tablet device, even my 12.9” iPad Pro. While I see an on-screen keyboard as a convenience for shorter text, writing a review like this on it would be a chore.

As mentioned earlier, I tried out the Volumio music player. This is an audio player that uses its own OS, not just an app to run on an existing OS. I had another microSD card available from another Raspberry Pi I’ve used in the past so all I had to do was install Volumio on it and swap cards in the RasPad and reboot. Volumio is meant to run headless and be controlled from other devices on the network, although it’s possible to set it up to run on the internal touchscreen as well. Volumio allows you to play audio from the internal microSD card, an external USB storage device, audio files on a network device through DLNA, web radio, and there’s even a plugin to run Spotify. Using Volumio you can listen through the internal speakers (although I don’t suggest this as they’re not exactly hi-fi quality), external speakers connected to the headphone jack, an external device connected by HDMI, or a USB audio interface or DAC. If you’re serious about playing high quality music, this makes for a great solution for just about any situation.
Speaking of audio, in my testing the fan was audible but not overwhelming. It might kick in more during video playback or game play but even in the quietest environments for me, it was just a slight whir in the background. In noisier environments, it was completely inaudible.

Lastly, I was able to use the RasPad 3 as a control device for some of what I do at work. In my day job, I’m an AV professional, mostly a sound operator now but occasionally as a camera operator, video director, presentation operator, and I even run lights once in a while. I’ve been using a Stream Deck from Elgato for several years to control sound systems, presentation software, video switchers, lighting systems, and other devices that are needed to do my job. Using a program called Companion I was able to pull up an interface on the RasPad for running control scripts and remote connections to these various devices without having to use another Stream Deck. The 10.1” screen is great for giving me easily touchable buttons to trigger these controls. Having it in a tablet form factor means I can walk around with the RasPad and my iPad and control just about everything anywhere in the venue.
What I like
I really enjoy having a Raspberry Pi, with all its flexibility, with a portable, touchscreen interface. I’ve used the official 7” Raspberry Pi touchscreen, which is great, but it’s not portable without adding an external battery, adding to the weight and complexity.
Having a device like this to learn programming, run home automation, general office and productivity use, a music and media player, and so many other capabilities is so convenient and fun.
What I’d change
I would make the external power connector USB-C. It would be nice to be able to charge/power this from any USB-C enabled power brick or even a battery pack. I noticed when I ran this in dual screen mode that the touchscreen didn’t respond the same – it was almost as if it was trying to touch points on both monitors so it was way off target from where I touched. I would think in dual screen mode touch wouldn’t be as important but there are times when it would be nice to have both.
Final thoughts
If you’re looking for a new way to use a Raspberry Pi, or you want to learn programming or have a handy media player in an all-in-one package, or any of the other scenarios mentioned above sound interesting to you, check out the RasPad 3. In my opinion, it’s a fun way to learn, create interesting DIY projects, and to do most of the general computing tasks you may encounter.
Source: By David Sheneman
https://the-gadgeteer.com/2021/09/27/raspad-3-review-raspberry-pi-in-a-tablet-form-factor/